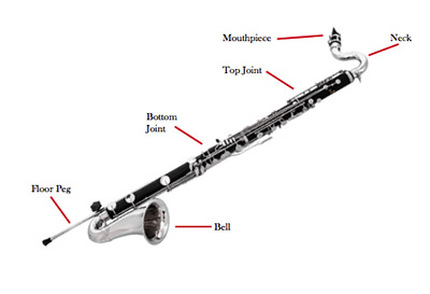
The Bass Clarinet is made up of 6 main parts depending on your Bass Clarinet. For more info on different Bass Clarinets, see Bass Clarinet. The main parts are the mouthpiece, the neck, the body, the floor peg, and the bell. The following explanation will describe, step by step, how to put together your Bass Clarinet.
Some Clarinets have only one body; these are a cheaper version of the Bass Clarinet. The more advanced version, with two parts of the body, goes down to a low C rather than an E flat. In our case, we will explain how to put together the cheaper version.
Some Clarinets have only one body; these are a cheaper version of the Bass Clarinet. The more advanced version, with two parts of the body, goes down to a low C rather than an E flat. In our case, we will explain how to put together the cheaper version.
Step 1
Attach the body to the bell. Where these two parts meet there should be cork to hold it together well. Also, while you set up the first parts of the instrument, put your reed in your mouth to wet it.
Step 2
Attach the floor peg to the bell. You can adjust it later to the correct height once you have attached your mouthpiece and neck and have sat down in desired chair.
Step 3
Attach the mouthpeice (reed unattached) to the neck.
Step 4
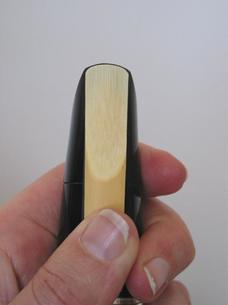
Put the reed on the mouthpiece, the flat side on the mouthpiece. By now, the reed should be wet enough. The fine end of the reed should be less than a millimetre from the top of the mouthpiece. It should look like the picture below. Note the distance between the mouthpiece and the top of the reed.
Attach the body to the bell. Where these two parts meet there should be cork to hold it together well. Also, while you set up the first parts of the instrument, put your reed in your mouth to wet it.
Step 2
Attach the floor peg to the bell. You can adjust it later to the correct height once you have attached your mouthpiece and neck and have sat down in desired chair.
Step 3
Attach the mouthpeice (reed unattached) to the neck.
Step 4
Put the reed on the mouthpiece, the flat side on the mouthpiece. By now, the reed should be wet enough. The fine end of the reed should be less than a millimetre from the top of the mouthpiece. It should look like the picture below. Note the distance between the mouthpiece and the top of the reed.
Step 5
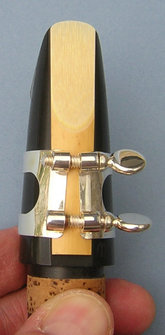
Carefully, while holding the reed in place on the mouthpiece, attach the ligature. The screw handles should be on the right side. For a Bass Clarinet, your ligature should be relatively loose, because the low notes can't have a lot of tension in the reed. It should look like the picture below.
Carefully, while holding the reed in place on the mouthpiece, attach the ligature. The screw handles should be on the right side. For a Bass Clarinet, your ligature should be relatively loose, because the low notes can't have a lot of tension in the reed. It should look like the picture below.
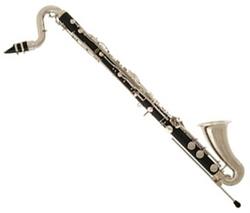 The Bass Clarinet all put together.
Step 6
Now hopefully, this whole time you have been adjusting your reed, the mouthpiece has been attached to the neck like I said to do earlier, because if you are to put the mouthpiece on the neck now, the force it would take to put the mouthpiece on the neck would misalign the reed. If you try and do this, you will know what I mean. It can be done, but putting the mouthpiece on the neck before saves difficulty.
So now that you have your mouthpiece and neck together, attach the neck to the top of the body. What I do is leave about a centimetre and a half of cork to be shown at the top, and this makes your sound a bit less sharp, so it is easier to be in tune.
Step 7
Adjust everything so it is centered. Make sure the bell is facing in front. Sit in the chair you want to play in, and adjust the floor peg so the mouthpiece is just above your mouth, so you are forced to sit in proper posture when you play. There should be a screw to tighten it with. If you lost the screw, or the screw won't tighten properly, use electrical tape.
Now you have completed all the steps! Everything should look like the picture to the right.
Here is a video explaining how to set up for more of a visual.
